5 Tips for Sealing Your Home and Reducing Utility Bill Costs This Winter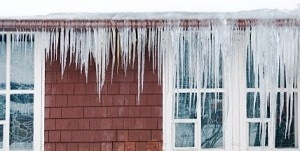
Winter is right around the corner. That means it’s time to start thinking about making sure your home is adequately sealed. Up to 30 percent of home energy costs can be wasted by air leaks that permit cold air to seep inside your home and warm air to escape outside. If you want to reduce utility bill costs this winter, you should consider these five do-it-yourself tips for fixing air leaks.
1. Inspect your attic for dirty insulation and your roof for ice dams
We put the biggest winter home sealing job first because it may also be the most important. Attics and basements are the largest sources of air leaks during the winter because of something called the “chimney effect.” The Chimney effect is caused by cool air as it comes in through the basement while warm air generated by the furnace rises into the attic. The effect creates pressure at the highest and lowest points in your home, which in turn causes your home to be drafty.
Dirty batt insulation is a sure sign of air movement and an indicator that your attic needs to be better sealed. Even finished attics aren’t immune from air leaks in sidewalls and knee walls. When you’re in your attic, be careful not to disturb any vermiculite insulation. If your insulation is made of gray, pea-sized granules, it may be made with asbestos. In that case, you’ll need to consult with a professional before you do anything yourself, which is probably a good idea anyway.
Ice dams are another good indicator that you’ve got substantial air movement into and out of your attic. Ice dams form when there is a temperature difference between the eaves and the higher parts of the roof. As the snow melts on the upper portion of the roof, it flows down to the edges of the roof where it re-freezes as temperatures drop, especially at night. A buildup of ice forms as the thaw-freeze cycle repeats itself. Ice dams can eventually damage your roof and cause water to leak into your home. The only solution is to eliminate the flow of warm air into the attic space. Again, a weatherization professional should be able to help you identify ways to do this.
2. Check for gaps around pipes that go through walls
Inspect the water and waste pipes that go through exterior walls to see how tightly they fit. Seal any gaps around pipes with spray foam insulation.
3. Seal gaps in the framing around windows and doors
Windows and doors are prime suspects when it comes to energy loss. Even if you have energy-efficient doors and windows, gaps in the framing around the best windows and doors can cause significant air leaks.
To fix gaps in window and door framing, remove moldings and fill the gaps using spray foam insulation that’s made specifically for doors and windows, which won’t warp framing as it expands to fill cracks. Replace the molding and complete the seal by applying a band of paintable acrylic-latex caulk around the frames. Don’t be intimidated by caulking. To make it look professional, you just need to use a non-glossy clear caulk that won’t show mistakes or buy a cheap caulking tool that scrapes away excess caulk while making the edge solid and straight. You can also install new weather-stripping if you need to.
4. Seal and insulate outlets and switches
To eliminate the flow of air through outlets and switches on the interior and exterior walls, remove the receptacle plates covering the outlets and switches and apply foam sealers. If there are gaps around outlet boxes you can seal them with spray foam insulation. Just be careful not to spray the interior of the box.
5. Check your basement for cracks
A good amount of air can leak into and out of your home in your basement. Check for cracks along with basement floors and walls, along with the sill plate, and at the top and bottom of rim joists, the final joists that support the basement ceiling, which is located at the ends of your building. To seal smaller cracks less than 1/4′ inch wide, use acrylic latex caulk. For larger cracks and gaps, use spray foam insulation.
It may be a good idea to have a home energy audit performed or to hire a weatherization professional to determine the source of air leaks throughout your home. If you’re a do-it-yourselfer, you can still probably repair most of the problems yourself. Just be careful, read instructions, and make sure you start soon. Winter will be here before you know it.
Got another tip for helping seal home air leaks this winter? Share them with us, as well as any advice for following any of the tips above.
Sources
6 Ways to Seal Your House for Winter, Sault Ste. Marie Evening News, Sept. 7, 2011.